ADF Functions
ADF offers an expression language for data transformation, control flows and other operations. It is a very intuitive and documentation supported language, but in many cases requires finding the best way how to utilize those expressions and also, it requires more of a developer's thinking for resolving certain problems. We will focus on arrays this time or some people like to call them lists even though there is a distinction between the two across many programming languages.
Problem
We will tackle a challenge of finding common elements between two lists of an entity. For example, match betwen CarBrandList=["Ford", "Chevrolet", "Buick", "Volkswagen", "Lexus"] and FilteredCarBrandList=["Ford", "Volkswagen"] should result in ResultCarBrandList=["Ford", "Volkswagen"] because those are two values appearing in both lists.
- CarBrandList=["Ford", "Chevrolet", "Buick", "Volkswagen", "Lexus"]
- FilteredCarBrandList=["Ford", "Volkswagen"]
- ResultCarBrandList=["Ford", "Volkswagen"]
Quick Solution
Use of either, "intersection" or "contains" function will do the work depending on the type of ADF activity used:
- Expression in "Set Variable" activity: @intersection(pipeline().parameters.FileList,
pipeline().parameters.FilterFileList)
Pipeline configuration:
- ADF actvity: Set Variable
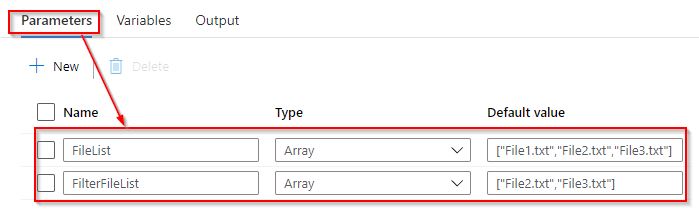
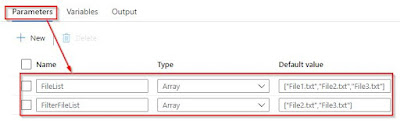
- Pipeline parameters:FileList=["File1.txt","File2.txt","File3.txt"], FilterFileList=["File2","File3"]
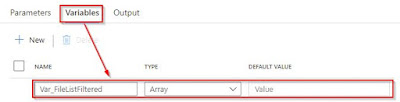
- Variable: var_ResultList
- Expected result: var_ResultList=["File2.txt","File3.txt"]

- Expression in "Filter" activity: @contains(pipeline().parameters.FilterFileList, item().name )
Pipeline configuration:
- ADF actvities: Get Metadata, Filter
- Pipeline parameters:FilterFileList=["File2.txt","File3.txt"]
- Get Metadata result returned from Azure Blob Storage: ["File1.txt","File2.txt","File3.txt"]
- Expected result: ["File2.txt","File3.txt"]


Environment
- Azure subscription
- Azure Data Factory
- Test files - create empty files for the following demo: "File1.txt","File2.txt","File3.txt"
- Azure Blob Storage - test file uploaded to Blob Storage
Collection Functions
Before starting with examples, let’s take a look for available functions in ADF, and "contains" and "intersection" look like obvious choice.

"Contains" Function
After a a quick look into MS documentation and "contains" looks like a logical function, which checks a value existence in a collection.

"Intersection" Function
As per documentation, "intersection" function works as a slicer between multiple collections or as mentioned, let’s call them lists or arrays or values.

Solution
- Array filter - "Contains" Function – We are going to test 2 different scenarios here by using "Set Variable" activity:
-
Filter array by a single string value - This first example filters parameter FileList by a single value and it returns the value if it exists in FileList.
@if( contains(pipeline().parameters.FileList, pipeline().parameters.FilterFile), pipeline().parameters.FilterFile, '') -
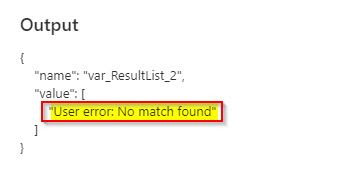
Filter array by another array – Filter is not working in this way because it’s not able to filter array by another array. I found documentation contradictory here because it states that array can be used as a filter under "value" property, but from some reason it doesn’t work. First thing we could think of is to use Foreach activity, but that’s a performance expensive solution. Keep with me for the next example to resolve the issue.
@if( contains(pipeline().parameters.FileList, pipeline().parameters.FilterList), pipeline().parameters.FilterList, array('User error: No match found'))
-
Array Filter - "Intersection" Function – Intersection function looks like a more obvious choice when dealing with collections and it will return common values that are included in both arrays. "Set Variable" activity has bee used for demo purposes.
@intersection(pipeline().parameters.FileList,pipeline().parameters.FilterFileList)
-
Blob List - Array Filter – Let’s use a real-life example on filtering file list returned from Blob Storage, where we are trying to find file existence in the blob storage. You could imagine if you have thousands of files sitting in your Azure Blob Storage and you want to know if there is only 2 files there and based on that you could decide what to do with them further up the stream in your pipeline. Solution is very simple, it’s the way to filter Blob Storage returned file list by our own list of files specified in an array.
"Metadata" activity has been used to return list of files from Blob Storage and "Filter" activity to find common elements between our own file search list and Blob Storage file list.
Let’s consider both "intersection" and "contains" functions for the following examples.
- Using "intersection" function:
There is a little bit of work that needs to be done here and it’s around "Filter" activity in ADF, where we have to retrieve items first by using "childitems" property returned from Metadata Activity, and then pass the values or collection of items by "item().name" to be filter by our parameter "pipeline().parameters.FileList". Another thing to notice is that "createArray(item().name)" has been used because value returned in "item().name" is in a string format and we are trying to compare it with another array, so it requires converting our value to an array. Also, "not-empty" has been used to return a logical result instead of collection returned by "intersection" function.
Filter activity setup:
- Items: @activity('Metadata_BlobStorage').output.childitems
- Condition: @not(empty( intersection( createArray(item().name), pipeline().parameters.FileList) ) )
The solution works fine and it returns expected result, but it just seems like a lot of work around "intersection" function and using 3 different function is always a threat to performance. Notice that there is "item().name" property, which means that "Filter" activity works as an iterator selecting individual items from "childitems" and "item().name" will be a single string value accordingly.
-
Using "contains" Function:
With "contains" function things look much easier and value returned from "item().name" is being compared with "parameters.FileList" for existence. This looks like a simpler implementation and we will take it as our final solution.
Filter activity setup:
- Items: @activity('Metadata_BlobStorage').output.childitems
- Condition: @contains(pipeline().parameters.FilterFileList, item().name )
- Using "intersection" function:
Conclusion
Both, "contains" and "intersection" function look like great options and based on the demo from above, the following are recommendations:
- Filter activity – use contains function.
- Set Variable activity – use intersection function.
Azure Data Factory - Demo Setup
"PL_01-ArrayContains" Pipeline
-
Parameters

-
Variables

-
Set Variable "ContainsString" activity

- Set Variable "ContainsString" activity - expression
Expression: @if( contains(pipeline().parameters.FileList, pipeline().parameters.FilterFile), pipeline().parameters.FilterFile, '')

- Set Variable "ContainsString" activity - result

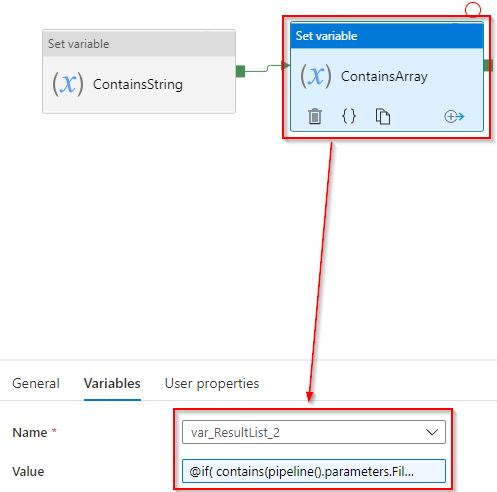
- Set Variable "ContainsArray"
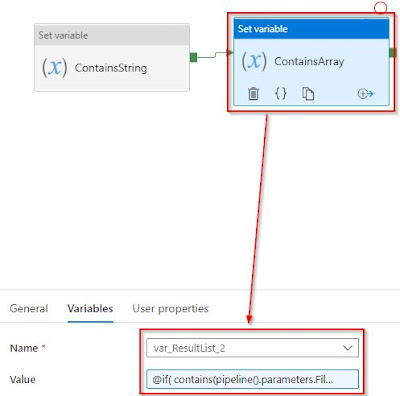
- Set Variable "ContainsArray" activity - expression
Expression: @if( contains(pipeline().parameters.FileList, pipeline().parameters.FilterList), pipeline().parameters.FilterList, array('User error: No match found'))

- Set Variable "ContainsArray" activity - result
-
Parameters
"PL_02-ArrayIntersection" Pipeline
- Parameters
- Variables

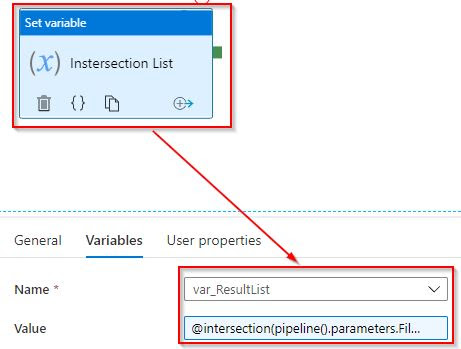
- Set Variable "Intersection List" activity

- Set Variable "Intersection List" activity - Expression
Expression: @intersection(pipeline().parameters.FileList,pipeline().parameters.FilterFileList)

- Set Variable "Intersection List" activity - result

- Parameters
-
"PL_03-ArrayFilterBlobList" Pipeline
- Parameters

- Blob Storage "DS_AZBS_Binary_txt" dataset - it requires linked service connection
- Get Metada "Metadata_BlobStorage" activity

- Filter "FilterByArray" activity

- Filter "FilterByArray" activity - Items expression
Expression: @activity('Metadata_BlobStorage').output.childitems

- Filter "FilterByArray" activity - Condition expression
Expression: @contains(pipeline().parameters.FilterFileList, item().name )

- Blob Storage - files uploaded

- Filter "FilterByArray" activity - result

- Parameters